Packing school lunches can feel like running a marathon every single morning. You stand there staring into the fridge, wondering what combination of foods will actually get eaten rather than traded away or tossed in the trash. The challenge intensifies when you’re trying to balance nutrition with foods your child will genuinely enjoy, all while racing against the clock before the school bus arrives.
Most parents default to the standard sandwich-chips-apple combo because it’s quick and familiar. Yet kids often return home with half-eaten lunches, complaining they’re bored with the same foods day after day. This pattern creates a frustrating cycle where you’re spending money on food that goes uneaten while your child misses out on important nutrients during their school day. The good news is that breaking free from sandwich monotony doesn’t require culinary expertise or hours of preparation time.
Creating exciting, nutritious lunchboxes that kids actually want to eat involves simple swaps, clever presentation tricks, and a bit of advance planning. We’ll share practical ideas that transform ordinary ingredients into lunchbox adventures, from protein-packed alternatives to colorful finger foods that make healthy eating fun. Keep reading to discover how small changes can revolutionize your morning routine and your child’s lunchtime experience.
Why Your Child’s Lunchbox Needs a Creative Makeover
The same turkey sandwich appearing day after day in a lunchbox does more than bore your child – it can actually impact their relationship with food. When kids encounter predictable meals repeatedly, they often stop eating them altogether, choosing to go hungry rather than face another identical lunch. This pattern affects their afternoon energy levels, concentration in class, and overall nutritional intake during crucial growing years.
How boring lunches affect eating habits
Children who consistently receive monotonous lunches develop selective eating patterns that can persist into adulthood. They start associating healthy foods with boredom, making them less likely to choose nutritious options when given alternatives. Research shows that kids exposed to varied foods during childhood develop more adventurous palates and healthier eating habits long-term.
The social aspect of lunchtime plays a significant role too. Kids compare lunches, and those with interesting, varied meals often feel more confident and engaged during lunch periods. A child opening an exciting lunchbox experiences anticipation rather than resignation, which positively impacts their entire eating experience.
The connection between variety and nutrition
Different foods provide different nutrients, and rotating lunch options ensures your child receives a broader spectrum of vitamins and minerals. A sandwich might provide protein and carbohydrates, but switching to a grain bowl one day, a protein box another, and wraps on alternating days introduces diverse nutrient profiles. This variety supports better growth, immune function, and cognitive development.
Color variety in lunchboxes correlates directly with nutritional diversity. Red bell peppers offer different vitamins than green cucumbers, while orange carrots provide nutrients distinct from purple grapes. By focusing on creating rainbow lunchboxes throughout the week, you naturally increase the nutritional value without counting vitamins or obsessing over specific nutrients.
What kids actually want in their lunches
Children crave autonomy and choice in their meals. They prefer foods they can eat independently without struggling with packaging or needing adult assistance. Items that allow mixing and matching appeal to their desire for control – think separate compartments with various options rather than pre-assembled meals.
Visual appeal matters tremendously to young eaters. Foods cut into fun shapes, arranged in patterns, or presented in colorful containers generate excitement before the first bite. Kids also appreciate interactive elements in their lunches: foods they can dip, stack, or combine themselves during mealtime.
Temperature preferences often go overlooked. Many children prefer room-temperature foods over items that have become lukewarm in thermoses. Understanding your child’s specific temperature preferences helps ensure foods get eaten rather than avoided.
Making healthy food appealing to young eaters
Presentation transforms ordinary healthy foods into lunchbox treasures. Cucumber rounds become “coins,” cherry tomatoes turn into “jewels,” and carrot sticks become “swords” for food adventures. These simple naming conventions and presentations make vegetables suddenly interesting without changing their nutritional value.
The key strategies for making healthy foods irresistible include:
Small Portions: Large amounts overwhelm kids; tiny portions feel manageable and fun
Familiar Pairings: Introduce new foods alongside established favorites
Fun Containers: Colorful silicone cups or shaped containers add visual interest
Hidden Vegetables: Incorporate veggies into items like muffins or energy balls
Choice Options: Pack two healthy options and let them choose which to eat first
Involving children in lunch planning increases their investment in eating what’s packed. Weekend menu planning sessions where kids select from healthy options you provide gives them ownership while maintaining nutritional standards.
Quick and Easy Protein-Packed Alternatives
Protein keeps kids satisfied and focused throughout their school day, yet many parents struggle to move beyond deli meat sandwiches. The truth is, countless protein options travel well, taste great at room temperature, and take minimal preparation time. These alternatives provide the staying power kids need while adding variety to their lunch routine.
Mini protein boxes and bento ideas
Creating miniature protein boxes transforms lunch into an exciting discovery experience. Picture a compartmentalized container filled with hard-boiled egg halves, cheese cubes, hummus, and turkey roll-ups. This approach lets kids graze through different proteins while feeling like they’re eating a special meal rather than typical lunch fare.
Bento-style lunches naturally encourage protein variety. One compartment might hold edamame, another contains cubed chicken from last night’s dinner, while a third houses Greek yogurt for dipping vegetables. The visual separation makes each protein component feel special and prevents flavors from mixing in ways kids might find unappealing.
The beauty of protein boxes lies in their flexibility. You can prep several combinations on Sunday, storing them in containers that go straight from fridge to lunchbox. This system eliminates morning decision fatigue while ensuring your child gets adequate protein regardless of which box you grab.
Egg-based options that travel well
Eggs offer complete protein in incredibly versatile forms that work perfectly for school lunches. Mini frittata muffins baked in advance provide grab-and-go options that taste excellent cold. Pack them with vegetables your child enjoys, cheese for extra appeal, and perhaps some breakfast meat for heartier appetites.
Hard-boiled eggs can be transformed beyond basic. Try making them into egg salad pinwheels using whole wheat tortillas, or slice them onto crackers with a small container of everything bagel seasoning for dipping. Deviled eggs packed in special containers designed to prevent sliding stay fresh and intact until lunchtime.
Egg-based items pack best in rigid containers that prevent crushing. Silicone muffin cups work wonderfully for keeping mini frittatas separate and protected. Remember to include a small ice pack to maintain safe temperatures, especially during warmer months.
Creative uses for leftover dinner proteins
Last night’s grilled chicken transforms into tomorrow’s lunch hero with minimal effort. Dice it for a protein-packed pasta salad, thread it onto skewers with vegetables, or stuff it into whole wheat pita pockets with their favorite toppings packed separately.
Meatballs work exceptionally well for lunches. Whether beef, turkey, or chicken-based, they’re easy to eat, stay moist, and pair with various dipping sauces. Pack them with toothpicks for easy eating and a small container of marinara, barbecue sauce, or even honey mustard for dipping excitement.
Fish might seem challenging for school lunches, but certain preparations work beautifully. Salmon patties, tuna salad served with crackers instead of bread, or even cold shrimp with cocktail sauce provide omega-3 rich options that break the typical lunch mold.
Think beyond traditional lunch formats when repurposing dinner proteins:
Taco Tuesday Leftovers: Pack seasoned ground beef separately from taco shells
Stir-Fry Remnants: Cold Asian-flavored proteins work great with rice crackers
Roast Beef Rolls: Spread with cream cheese and wrapped around pickle spears
Pulled Pork: Excellent in quesadillas that taste good at room temperature
Grilled Salmon: Flaked into pasta salad or grain bowls
Plant-based protein options kids will eat
Plant-based proteins often get overlooked in kids’ lunchboxes, yet many options appeal to young palates. Chickpea “cookie dough” made with chickpeas, nut butter, and mini chocolate chips provides protein while feeling like dessert. Roll them into balls for easy, poppable protein bites.
Nut and seed butters extend far beyond PB&J. Sunflower seed butter with apple slices, almond butter roll-ups with banana, or cashew butter energy balls offer variety while accommodating different school allergy policies. These options provide substantial protein along with healthy fats for sustained energy.
Bean-based options work when prepared creatively. Roasted chickpeas seasoned with ranch powder become crunchy snacks. Black bean brownies (yes, really!) taste like treats while packing protein. White bean hummus with colorful vegetables makes dipping fun and nutritious.
How to keep proteins fresh until lunchtime
Temperature control makes the difference between proteins that get eaten and those that get tossed. Insulated lunchboxes with proper ice packs maintain safe temperatures for perishable proteins. Freeze yogurt tubes or juice boxes to serve double duty as cooling elements that thaw by lunchtime.
Separate wet and dry components to maintain textures. Pack dressings, sauces, and condiments in small containers, letting kids add them at lunchtime. This prevents sogginess while giving children control over their meal assembly.
Certain proteins actually improve when frozen and packed frozen. Frozen grapes with cheese cubes, frozen yogurt bark broken into pieces, or even frozen pancakes spread with nut butter thaw perfectly by lunch. These items help keep other foods cool while providing interesting texture variations.
Fun Finger Foods That Pack Nutritional Punch
Kids naturally gravitate toward foods they can pick up and eat with their hands. This preference for finger foods opens wonderful opportunities to pack nutrition into fun, grabbable formats. Moving beyond typical finger foods like chips and cookies, creative parents can transform healthy ingredients into exciting handheld adventures that disappear quickly at lunchtime.
Vegetable chips and creative veggie presentations
Store-bought veggie chips often contain as much oil and salt as regular potato chips, but homemade versions deliver genuine nutrition with satisfying crunch. Thinly sliced sweet potatoes, beets, or zucchini baked until crispy provide vitamins and fiber while satisfying that chip craving. Season them with everything from simple salt to ranch powder or cinnamon for variety.
Raw vegetables become infinitely more appealing through creative cutting and presentation. Use cookie cutters to transform bell peppers, cucumbers, and jicama into stars, hearts, or their favorite shapes. Thread cherry tomatoes, cucumber rounds, and cheese cubes onto pretzel sticks for edible vegetable kebabs that feel special.
The secret to getting vegetables eaten lies in making them convenient and fun. Pre-cut veggies into bite-sized pieces, removing any barriers to consumption. Pack them in clear containers so kids can see the rainbow of colors waiting inside.
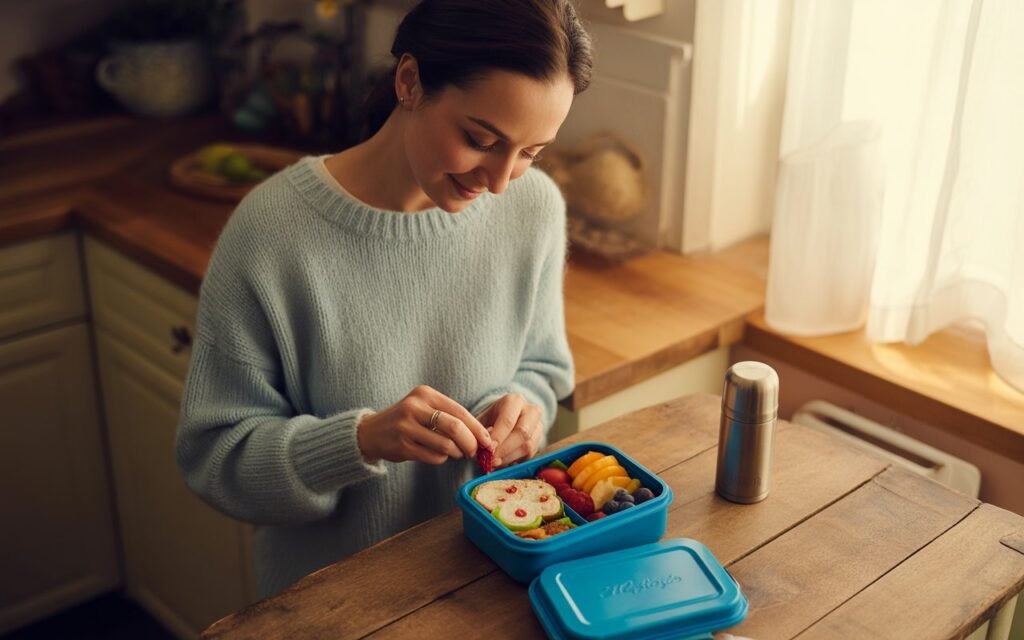
Fruit kebabs and creative fruit combinations
Building fruit kebabs transforms ordinary fruit into party food. Alternate colors and textures – strawberries, green grapes, pineapple chunks, and blueberries create visual appeal while providing various vitamins. Use fun skewers (with blunted ends for safety) or even pretzel sticks as edible handles.
Unexpected fruit combinations keep lunches interesting. Try watermelon cubes sprinkled with lime juice and chili powder (packed separately for kids to add themselves), or apple slices with a small container of caramel yogurt dip. Frozen grapes mixed with fresh berries provide temperature and texture contrasts kids find intriguing.
Creating fruit “sushi” rolls using flattened bread, cream cheese, and fruit strips rolled and sliced into rounds makes fruit feel like a special treat. These portable rounds pack easily and look impressive when lunch boxes open.
Homemade energy balls and bars
Energy balls require no baking and pack serious nutrition into bite-sized portions. A basic formula of dates, nuts, and add-ins can be customized endlessly. Chocolate chip cookie dough balls, birthday cake balls with sprinkles, or tropical versions with coconut and dried pineapple keep lunches exciting.
Granola bars made at home contain less sugar and more whole ingredients than store versions. Press mixtures of oats, nuts, seeds, and dried fruit bound with honey or nut butter into pans, then cut into portions. Wrap individually in parchment paper for easy packing.
These portable powerhouses work because they feel like treats while delivering sustained energy. Kids don’t realize they’re eating dates, chia seeds, or hemp hearts when they’re disguised in familiar, dessert-like formats.
Cheese and whole grain combinations
Cheese provides protein and calcium in forms kids typically enjoy. Move beyond basic string cheese to create interesting combinations. Mini whole wheat bagels with cream cheese faces decorated with vegetable features make lunch playful. Whole grain crackers layered with cheese and turkey become miniature “sandwiches” that feel special.
Creating “lunchable” style boxes with quality ingredients gives kids the commercial lunch experience with better nutrition. Include whole grain crackers, various cheese cubes, and additions like grapes, nuts, or dried fruit. The DIY assembly aspect appeals to kids’ desire for control over their meals.
Quesadillas cut into triangles, cheese and whole wheat pretzel combinations, or mini whole grain waffles used as “bread” for cheese sandwiches provide the whole grain-dairy combination in formats that travel well and taste good at room temperature.
Dips and dunkers that make vegetables irresistible
The magic of dips cannot be overstated when it comes to vegetable consumption. Kids who won’t touch plain carrots will happily crunch through them when ranch dressing is involved. Pack vegetables with individual containers of hummus, guacamole, yogurt-based dips, or nut butters for variety.
Creating colorful, fun dips increases vegetable intake dramatically:
Rainbow Hummus: Add beets for pink, spinach for green, or turmeric for yellow
Yogurt Ranch: Mix Greek yogurt with ranch seasoning for protein-packed dipping
Sweet Options: Vanilla yogurt with cinnamon for apple slices
Nut Butter Mixes: Almond butter with honey for celery boats
Cheese Sauces: Warm cheese sauce in a thermos for broccoli trees
The key is keeping dips and vegetables separate until eating time. Small containers with tight-fitting lids prevent spills while maintaining optimal textures. Including a variety of dippers – vegetables, whole grain crackers, pretzels – ensures something will get eaten even on picky days.
Make-Ahead Options That Save Morning Stress
Morning chaos disappears when lunches are already prepared and waiting in the refrigerator. Strategic weekend preparation and smart make-ahead strategies transform the dreaded lunch-packing routine into a simple grab-and-go process. These techniques save time while ensuring variety throughout the school week.
Sunday prep strategies for the week
Dedicating two hours on Sunday to lunch preparation pays dividends all week long. Start by washing and cutting all vegetables and fruits, storing them in containers that can go directly into lunch boxes. This single step eliminates the biggest morning time drain.
Creating an assembly line system makes prep efficient and even enjoyable. Line up five containers for each child, then move down the line adding components: proteins in one section, vegetables in another, fruits in a third. This method ensures balanced lunches while preventing decision paralysis during busy mornings.
Batch-cooking proteins provides the foundation for diverse lunches. Grill several chicken breasts, hard-boil a dozen eggs, and prepare a large batch of turkey meatballs. These proteins can be transformed throughout the week into different meals – chicken becomes salad one day, kebabs the next, and wrap filling on Wednesday.
Freezer-friendly lunchbox components
Your freezer can become the ultimate lunch-prep ally. Many items freeze beautifully and thaw perfectly by lunchtime, actually helping keep other lunch components cool. Muffins, whether savory egg muffins or sweet banana versions, freeze individually wrapped and go straight from freezer to lunchbox.
Sandwiches freeze surprisingly well when properly prepared. Spread both bread slices with nut butter or cream cheese (which acts as a moisture barrier), add jam or lunch meat, wrap tightly, and freeze. Avoid vegetables with high water content like lettuce or tomatoes, adding these fresh if desired.
Building a freezer stash of lunch components provides variety without weekly repetition. Mini pizzas on English muffins, breakfast burritos cut in half, and even pasta salad portions can be frozen in individual containers. Date everything and rotate through options to prevent monotony.
Overnight preparations that work
Some lunch preparations benefit from overnight rest, developing better flavors and textures by morning. Overnight oats prepared in small jars create grab-and-go breakfast-for-lunch options. Layer oats with yogurt, fruit, and a drizzle of honey for self-contained meals that require zero morning assembly.
Pasta salads, grain bowls, and marinated vegetables actually improve overnight. The flavors meld while you sleep, creating more delicious lunches than freshly assembled versions. Prepare these on Thursday or Sunday nights for meals that taste intentionally crafted rather than thrown together.
Mason jar salads assembled in reverse order (dressing first, sturdy vegetables next, greens on top) stay crisp for days. Prepare three at once, knowing you have healthy lunches ready without morning effort. Kids can shake and eat directly from the jar or dump contents into a bowl.
Batch cooking ideas for lunch variety
Cooking once and eating differently all week prevents both boredom and morning stress. A large pot of turkey chili becomes thermos lunches, nacho toppings with chips, and burrito bowl foundations throughout the week. Each presentation feels like a completely different meal.
Sheet pan cooking produces multiple lunch components simultaneously. Roast chicken thighs, sweet potato cubes, and broccoli on one pan, then divide into containers for various combinations. Add different grains and sauces to create distinct meals from the same base ingredients.
Meatballs represent the ultimate batch-cooking victory. Make massive batches monthly, freezing portions for quick lunch additions. Turkey meatballs work with marinara, Swedish sauce, or sweet and sour preparations. Chicken meatballs pair with buffalo sauce, teriyaki, or honey mustard.
Focus your batch cooking on versatile foundations:
Grains: Cook quinoa, rice, and pasta in large quantities for various uses
Proteins: Prepare plain versions that accept different seasonings later
Roasted Vegetables: Season simply so they work with multiple flavor profiles
Sauces: Make several varieties to transform the same ingredients
Baked Goods: Muffins, bars, and energy bites that freeze well
Storage solutions that maintain freshness
Proper storage makes the difference between prep that works and food that spoils before it’s eaten. Glass containers allow you to see contents easily while preventing flavor transfer. Invest in various sizes to accommodate different portion needs and lunch box configurations.
Vacuum-sealed bags remove air that causes premature spoiling, extending the life of cut vegetables and fruits. While the initial investment in a vacuum sealer might seem substantial, the reduction in food waste quickly justifies the cost.
Compartmentalized containers designed specifically for lunch packing keep foods separate and fresh. Wet items won’t make crackers soggy, and strong flavors won’t permeate mild foods. Look for containers with tight-fitting lids that prevent spills during transport.
Dating and labeling everything prevents the guessing game about food freshness. Use masking tape and permanent markers, or invest in erasable labels for containers. Include preparation date and contents for easy identification during rushed mornings.
How to Keep Food Fresh and Safe Until Lunchtime
Food safety in packed lunches requires more attention than many parents realize. The danger zone between 40°F and 140°F allows bacteria to multiply rapidly, potentially causing foodborne illness. Understanding proper storage techniques and temperature control ensures the nutritious lunch you pack remains safe and appetizing when the lunch bell rings.
The best containers for different foods
Different foods require different container strategies for optimal freshness. Sandwiches stay freshest in containers that allow minimal air circulation – tight-fitting rectangular containers work better than bags that allow sandwiches to shift and fall apart. Hard-sided containers also prevent crushing in crowded backpacks.
Salads and cut vegetables maintain crispness in containers with vented lids that allow excess moisture to escape. Without ventilation, condensation creates soggy vegetables that kids won’t eat. Many containers designed specifically for produce storage feature adjustable vents for customized airflow.
Hot foods require quality thermoses that maintain temperature for at least four hours. Wide-mouth versions work better for solid foods like pasta or rice dishes, while narrow openings better retain heat for soups. Preheating the thermos with boiling water for five minutes before adding food significantly improves heat retention.
Temperature control strategies
Maintaining safe temperatures requires more than tossing in a single ice pack. The location and number of cooling elements matters significantly. Place ice packs both above and below perishable items, as cold air sinks. Freezing water bottles or juice boxes provides additional cooling that becomes a drinkable component by lunchtime.
For hot foods, temperature maintenance starts with proper heating. Foods should reach 165°F before going into preheated thermoses. Pack hot and cold items in separate bags when possible, as the temperature differential can compromise both. An insulated lunch bag handles mixed temperatures better than standard lunch boxes.
Creating temperature zones within lunch boxes maximizes safety. Group items by temperature needs – all cold items together, shelf-stable snacks in another section. This organization prevents cold items from warming and reduces condensation on room-temperature foods.
Preventing soggy and mushy textures
Texture degradation ruins more lunches than spoilage. Wet ingredients should always be packed separately from dry components. A sandwich with tomato and lettuce added at home will be soggy by noon, but packing these items separately for assembly at lunch maintains appealing textures.
Paper towels strategically placed between food layers absorb excess moisture. Wrap sandwiches in paper towels before placing in containers, or line containers with towels when packing items prone to condensation. This simple step makes remarkable differences in food quality.
Certain preparation techniques prevent mushiness:
Toast Bread: Creates a barrier against moisture from spreads and fillings
Double Wrap: Plastic wrap directly on food, then container, minimizes air exposure
Strategic Layering: Cheese and meat against bread, condiments in the middle
Separate Compartments: Prevents flavor and moisture migration
Proper Drainage: Thoroughly drain canned fruits and pasta salads
Food safety guidelines for packed lunches
Perishable foods shouldn’t remain in the temperature danger zone for more than two hours, or one hour when temperatures exceed 90°F. This timeline starts when food leaves refrigeration, not when lunch begins. Consider how long lunches sit in warm classrooms before eating time.
Certain foods pose higher risks and require extra caution. Mayonnaise-based salads, dairy products, and cut melons need consistent refrigeration. If proper cooling isn’t possible, choose shelf-stable alternatives like nut butters, dried fruits, or unopened applesauce containers.
Teaching children food safety helps them make smart decisions about their lunches. They should know to keep lunch boxes away from heat sources, return ice packs to lunch boxes after eating, and recognize signs that food might be unsafe. Simple rules like “when in doubt, throw it out” empower kids to protect their health.
Smart packing techniques for maximum freshness
Layering foods strategically in lunch boxes affects both temperature retention and food quality. Place ice packs at the top of lunch boxes since cold air descends. Position the most perishable items directly against ice packs, using shelf-stable items as insulation for the outer layers.
Pre-chilling everything possible extends safe eating windows. Refrigerate lunch boxes overnight, use frozen fruit that thaws by lunchtime, and pack items directly from the refrigerator. These small steps add up to significant temperature differences hours later.
The lunch box itself impacts food safety. Insulated bags with thick walls maintain temperatures far better than thin fabric bags or metal boxes. Soft-sided coolers designed for lunch use often outperform traditional lunch boxes. Clean lunch boxes thoroughly between uses, as bacteria from previous meals can contaminate fresh food.
Consider packing backup options for particularly warm days or extended time before lunch. Individual packages of crackers with shelf-stable nut butter, applesauce pouches, or granola bars ensure your child has safe food available even if perishable items become questionable.
Making Lunchtime Fun Again
Transforming school lunches from boring sandwiches into creative, nutritious meals doesn’t require professional chef skills or excessive time. The strategies we’ve explored – from protein-packed alternatives to smart make-ahead techniques – prove that healthy, exciting lunches are achievable for every family. Small changes like using fun containers, involving kids in meal planning, or simply cutting foods into interesting shapes can revolutionize your child’s lunch experience while ensuring they receive the nutrition needed for growth and learning.
The investment you make in creative lunch planning pays dividends beyond the lunch table. Children who enjoy varied, appealing lunches develop healthier relationships with food, broader palates, and better eating habits that last into adulthood. Start with one or two new ideas this week, gradually building your repertoire of lunch options until packing exciting, nutritious lunches becomes second nature. Your efforts today shape not just what your child eats at lunch tomorrow, but their entire approach to healthy eating for years to come.
Frequently Asked Questions
Q: How far in advance can I safely prepare lunch items?
A: Most lunch components stay fresh for 3-5 days when properly stored in airtight containers in the refrigerator. Cooked proteins, hard-boiled eggs, and cut vegetables maintain quality for up to 5 days, while dressed salads and sandwiches are best made within 24 hours of eating.
Q: What should I do if my child’s school doesn’t allow nuts?
A: Sunflower seed butter, soy butter, and pea butter make excellent nut-free alternatives that provide similar protein and healthy fats. Cheese, yogurt, hard-boiled eggs, and beans offer additional protein options that comply with allergy policies.
Q: How can I keep hot food warm without a microwave at school?
A: Invest in a quality thermos and preheat it with boiling water for 5 minutes before adding piping hot food. Pack foods at 165°F or higher, and choose items like pasta, rice dishes, or soups that retain heat well. The food should stay safely warm for 4-5 hours.
Q: What’s the best way to encourage my picky eater to try new lunch foods?
A: Introduce new items alongside familiar favorites using the “one new, two familiar” rule. Involve your child in selecting and preparing new foods, and present them in fun, appealing ways. Start with tiny portions of new items to avoid overwhelming them.
Q: How much should I pack for my child’s lunch?
A: Pack slightly more than you think they’ll eat, offering variety rather than large portions of single items. Include 1 protein serving, 2-3 vegetable or fruit servings, 1 whole grain serving, and 1 small treat. Observe what comes home uneaten and adjust accordingly.
Q: Which fruits and vegetables stay freshest in lunch boxes?
A: Apples, grapes, carrots, bell peppers, and snap peas maintain quality well. Avoid easily bruised items like bananas or peaches unless protected in hard containers. Cherry tomatoes, cucumber rounds, and orange slices work well when packed properly with moisture control.
Q: Can I pack smoothies for school lunch?
A: Yes, smoothies work well in quality insulated bottles that prevent spills. Freeze smoothies overnight and pack them frozen; they’ll thaw to a perfect drinking consistency by lunch. Include a wide straw and choose bottles that are easy for kids to open independently.
Q: How do I prevent lunch boxes from developing odors?
A: Wash lunch boxes weekly with warm soapy water and air dry completely. Wipe down daily with antibacterial wipes, and occasionally deep clean with a baking soda paste. Store with the lid open when not in use to prevent moisture buildup.