Planning a wedding involves countless decisions, and creating a stunning cake table display often feels like choosing between breaking the bank or settling for something ordinary. The wedding cake traditionally serves as a centerpiece of the reception, drawing guests’ attention and creating countless photo opportunities. Yet many couples discover that professional cake table styling can cost hundreds or even thousands of dollars, pushing already stretched budgets to their limits.
The good news is that achieving an expensive-looking cake table doesn’t require spending a fortune. Professional designers rely on specific principles and techniques that anyone can master with the right guidance. These methods focus on creating visual interest through layering, texture, and strategic placement rather than costly materials. Smart couples across the country are discovering that dollar store finds, thrift shop treasures, and simple DIY projects can produce displays that rival those seen in luxury wedding magazines.
Whether you’re working with a modest budget or simply prefer to invest your wedding funds elsewhere, the following sections will show you exactly how to create a cake table display that photographs beautifully and impresses your guests. From understanding what makes decor look expensive to finding affordable materials and styling them professionally, you’ll discover practical strategies that transform ordinary elements into extraordinary wedding decor. Let’s explore how to achieve that high-end look without the premium price tag.
- What Creates Expensive-Looking Wedding Cake Table Decor
- How to Transform Basic Materials Into Luxury Displays
- Which DIY Elements Add the Most Visual Impact
- Where to Source Affordable Decor That Looks Premium
- How to Style Your Cake Table Like a Professional Designer
- Your Dream Cake Table Within Reach
- Frequently Asked Questions
What Creates Expensive-Looking Wedding Cake Table Decor
Creating a cake table that appears professionally styled starts with understanding the visual elements that signal quality and sophistication. Professional wedding designers know that perception of value comes less from actual cost and more from thoughtful composition and attention to detail.
Layering and depth elements
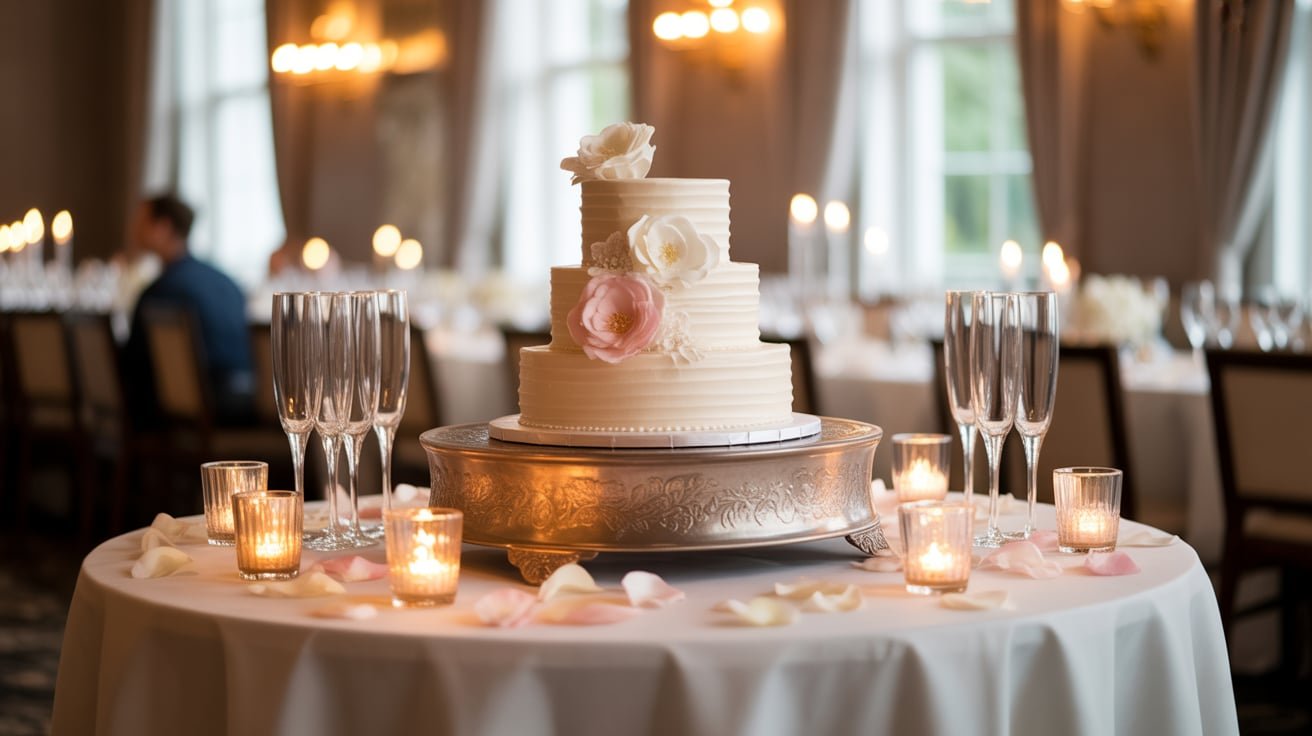
The secret to professional-looking displays lies in creating multiple visual layers rather than placing everything at one height. Start with your tablecloth as the foundation layer, then build upward with varying heights and depths. A simple white tablecloth gains instant sophistication when topped with a contrasting table runner, perhaps in tulle or lace found at fabric remnants sales.
Add dimension by incorporating risers or cake stands at different levels. Books wrapped in decorative paper can serve as invisible platforms beneath your linens, creating subtle elevation changes that draw the eye. Place smaller decorative elements at various distances from the table edge, avoiding the common mistake of lining everything up in a single row.
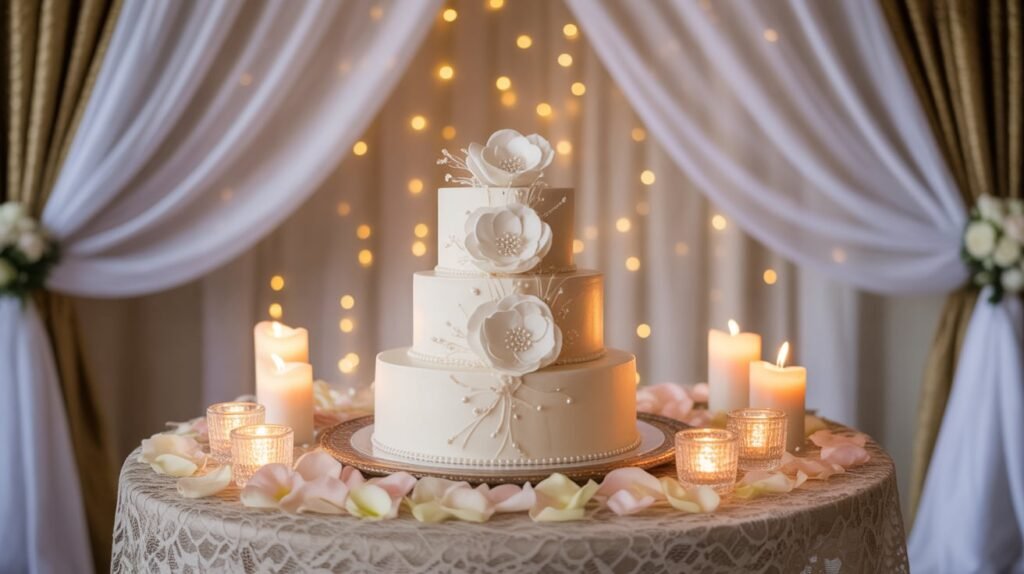
Strategic use of lighting
Lighting transforms ordinary setups into magical displays more effectively than any other single element. Professional planners understand this principle and use it extensively, but you can achieve similar results affordably.
Battery-operated LED string lights woven through greenery or draped behind sheer fabric create a soft glow that photographs beautifully. These lights cost mere dollars at discount stores yet produce results comparable to expensive uplighting. Votive candles in clear glass holders (often available in bulk for under $20) add warmth and movement to your display.
Position your cake table near existing venue lighting whenever possible. Natural window light during daytime receptions or strategic placement beneath chandeliers during evening events provides free illumination that enhances your setup.
Color coordination principles
Cohesive color schemes immediately signal intentional design rather than random decoration. Select two to three colors maximum for your cake table decor, ensuring they complement both your cake design and overall wedding palette.
Consider these professional approaches to color:
Monochromatic Magic: Using various shades of a single color creates sophisticated depth without complexity.
Metallic Accents: Adding touches of gold, silver, or copper through spray-painted elements elevates any color scheme.
Neutral Foundation: Building on whites, creams, and beiges allows colorful cakes to shine as the star.
Seasonal Harmony: Incorporating colors that match the season creates natural elegance.
The key lies not in expensive materials but in disciplined color selection. A collection of mismatched thrift store vases becomes elegant when spray-painted in matching metallics. Dollar store ribbons in coordinating shades tie disparate elements together professionally.
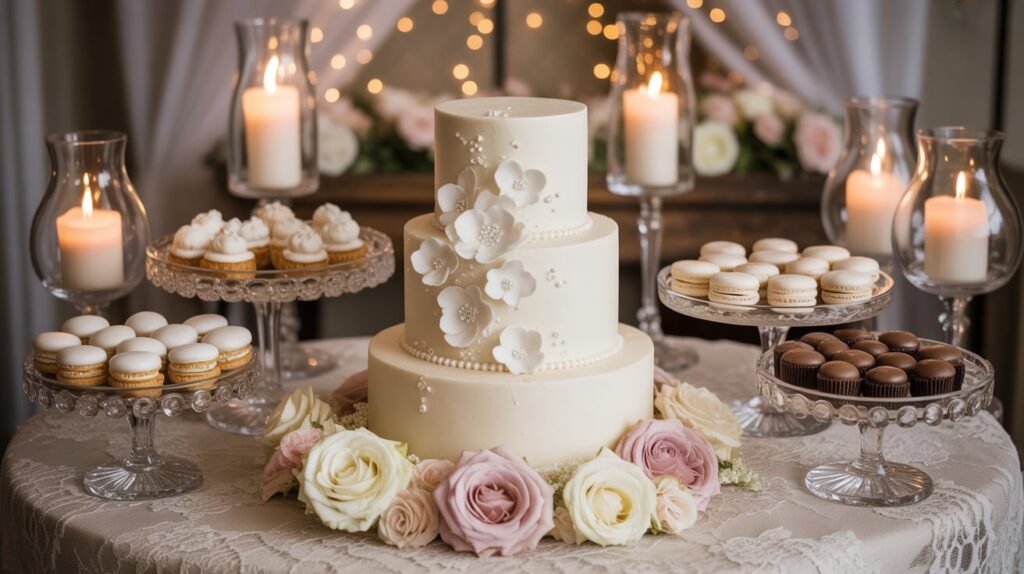
Texture combinations that elevate the display
Professional designers layer textures to create visual interest that photographs beautifully from every angle. This technique makes simple materials appear far more expensive than their actual cost. Smooth surfaces paired with rough textures, shiny elements contrasted with matte finishes, and soft fabrics combined with hard surfaces all contribute to a rich, luxurious appearance.
Start with fabric textures. Layer a basic polyester tablecloth with cheesecloth, burlap, or lace remnants for instant sophistication. These materials cost little at fabric stores, especially from the remnant bin. Incorporate natural textures through greenery, wood slices, or stones collected from your yard or local park.
The beauty of texture mixing is that imperfections often add character rather than detracting from the display. Vintage doilies with slight yellowing, weathered wood pieces, or garden flowers with natural irregularities all contribute authentic charm that money can’t buy.
How to Transform Basic Materials Into Luxury Displays
Taking everyday items and elevating them into wedding-worthy decor requires creativity and strategic styling rather than a large budget. The transformation happens through clever techniques that disguise humble origins while highlighting beautiful qualities.
Working with everyday fabrics
Inexpensive fabrics become elegant draping when handled correctly. Muslin, available for a few dollars per yard, creates stunning backdrops when gathered and lit properly. The key lies in using enough fabric to create fullness – skimping on quantity makes even expensive materials look cheap.
Transform basic white sheets into elegant table skirting by pleating them carefully and securing with clear tape or pins hidden beneath the table edge. Add romance with yards of tulle from the fabric store, often priced under $2 per yard. Gather it loosely and layer it over your base fabric for a cloud-like effect that photographers love.
Repurposing household items
Your home likely contains numerous items perfect for cake table styling. Mason jars become elegant vases when wrapped with lace or ribbon. Old picture frames, especially ornate ones, create sophisticated signage holders or decorative accents when spray-painted in metallics.
Books stacked and wrapped in decorative paper serve as risers for smaller decorative elements. Clear glass bowls filled with water and floating candles provide ambiance for pennies. Even simple white plates from your kitchen can display decorative elements or serve as chargers beneath your cake stand.
Consider items differently than their intended use. A vintage ladder becomes a rustic display stand for greenery or photos. An old window frame transforms into a unique backdrop element. Lace curtains from grandma’s attic draped behind the cake create vintage romance.
Creating height and dimension
Professional displays never keep everything at table level. Height draws the eye upward and creates visual drama that makes spaces feel more decorated than they actually are. You don’t need expensive pedestals or professional risers to achieve this effect.
Stack sturdy boxes of varying sizes, then drape them completely with fabric to create invisible platforms. Tall cylinder vases from the dollar store filled with branches or tall flowers add vertical interest affordably. Even stacked vintage suitcases (often found cheaply at thrift stores) create unique height while adding character.
Remember that stability matters more than perfection. Secure tall elements properly to prevent disasters, using museum putty or double-sided tape as needed. Test your setup thoroughly before the event to ensure everything remains stable throughout your celebration.
Using mirrors and reflective surfaces
Mirrors multiply the impact of every decorative element while adding glamour to your display. Thrift stores regularly stock old mirrors for just a few dollars. Don’t worry about frames – in fact, frameless mirrors often look more modern and expensive.
Place mirrors beneath candles to double their glow. Position them behind flower arrangements to create fuller-looking displays. Use them as bases for your cake stand to add sparkle and dimension. Small compact mirrors scattered among other decorative elements catch and reflect light beautifully.
For a cohesive look, stick to one type of reflective surface. Mix different sizes but maintain consistency in finish – all silver, all gold, or all clear glass. This uniformity creates intentional design rather than random placement.
Which DIY Elements Add the Most Visual Impact
Some DIY projects deliver dramatically more visual payoff than others, making them worth your crafting time. Focus your efforts on these high-impact elements that guests will notice and remember.
Paper flower backdrops
Large paper flowers create stunning focal points that photograph beautifully and cost a fraction of real blooms. With tissue paper or crepe paper from the dollar store, you can create oversized roses, peonies, or dahlias that make dramatic statements.
The technique is surprisingly simple. Layer multiple sheets of tissue paper, accordion fold them, secure the center with wire or string, then gently separate each layer to create full, dimensional blooms. Make them in varying sizes from 6 inches to 24 inches across for professional-looking arrangements.
Position your largest flowers as backdrop elements, mounting them on a simple wooden frame or directly on the wall behind your cake table. Smaller versions scattered on the table itself tie the design together. Choose colors that complement your cake or stick with classic white for timeless elegance.
Greenery arrangements
Greenery offers more impact per dollar than almost any other decorative element. Whether you use eucalyptus, ivy, ferns, or even branches from your yard, green elements add life and luxury to any display.
Start collecting greenery a day or two before your wedding. Many types last well out of water for several hours, especially when misted lightly. Create simple garlands by wiring pieces together or simply lay branches artfully across your table. The organic shapes and natural variations add authentic beauty no artificial arrangement can match.
Here’s how to maximize greenery impact:
Length Matters: Long trailing pieces of ivy or eucalyptus create drama.
Mix Textures: Combine different leaf shapes and sizes for professional depth.
Add Unexpected Elements: Herbs like rosemary or lavender add fragrance and visual interest.
Consider Seasonality: Pine branches in winter, flowering branches in spring – work with nature’s offerings.
Candle displays
Nothing creates ambiance quite like candlelight, and you can achieve spectacular effects without spending much money. Buy pillar candles in bulk online or at warehouse stores, then create varying heights using glasses, jars, or bowls you already own.
Float tea lights in shallow dishes filled with water and flower petals for an elegant touch. Group pillar candles of different heights on a mirror or metallic tray for dramatic effect. Wind battery-operated fairy lights around pillar candles for extra sparkle without fire risk.
Safety remains paramount with real flames. Keep candles away from flammable decorations, ensure stable placement, and consider LED alternatives if your venue has restrictions. Many battery-operated candles now feature realistic flickering effects indistinguishable from real flames in photographs.
Fabric draping techniques
Dramatic fabric draping transforms plain spaces into elegant settings. The secret lies in using enough fabric to create generous swags and puddles rather than stretching material taut. Sheer fabrics work particularly well because they’re lightweight, inexpensive, and create beautiful layers when overlapped.
Create a simple backdrop by hanging a curtain rod or rope between two points, then draping fabric over it. Let the fabric puddle on the floor for a luxurious effect. Add battery-operated lights behind sheer fabric for a magical glow. Twist two contrasting fabrics together before draping for added visual interest.
For table draping, start with your fabric at the back of the table, bring it forward in a swag, and secure it at intervals with ribbon or decorative clips. This technique works beautifully with tulle, organza, or even inexpensive polyester sheers from discount stores.
Where to Source Affordable Decor That Looks Premium
Knowing where to shop makes the difference between overspending and finding incredible deals on wedding-worthy decorations. The best sources often hide in plain sight, requiring only a shift in perspective to recognize their potential.
Thrift store treasures
Thrift stores offer incredible variety at rock-bottom prices, but success requires strategy. Visit regularly in the months before your wedding, as inventory changes constantly. Look beyond the obvious wedding sections – home decor, kitchenware, and even book sections hold possibilities.
Vintage silver-plated trays become elegant display platforms for desserts or decorative elements. Old crystal vases and bowls add sparkle and sophistication. Ornate picture frames transform into table numbers or signage. Don’t overlook candlesticks, mirrors, and decorative plates that might need only minor cleaning or spray painting.
Focus on quality materials rather than perfect condition. Tarnished silver polishes beautifully, vintage lace adds authentic charm despite slight discoloration, and worn leather-bound books stack into romantic display pieces. These imperfections often add character that new items lack.
Dollar store transformations
Dollar stores have evolved far beyond cheap plastic items. Many now stock surprising wedding-appropriate finds including glass vases, LED candles, artificial flowers, ribbons, and basic craft supplies. The key lies in buying multiples to create impact through repetition.
Twenty matching glass votives make a stronger statement than five expensive ones. A dozen small mirrors create more sparkle than one large one. Bulk buying at dollar prices allows you to achieve the abundance that signals luxury in event design.
Transform dollar store basics through simple techniques. Spray paint transforms plastic items into metallic elegance. Hot glue and ribbon disguise cheap edges. Grouping similar items together creates intentional design rather than random scatter.
Online marketplace finds
Facebook Marketplace, Craigslist, and local buy-sell groups offer exceptional deals from recent brides selling barely-used wedding decor. Search terms like “wedding decor lot” or “wedding decorations bulk” often yield complete packages at fraction of retail cost.
Many sellers offer entire color-coordinated collections including linens, centerpiece elements, and ceremony decorations. Even if you only use portions, the per-item cost often beats any retail option. Post-wedding sales typically happen within weeks of events, so check regularly.
Don’t forget about online auction sites for bulk purchases. Wholesale lots of candles, vases, or fabric often sell for less than retail when bought in quantity. Split larger lots with other engaged friends or resell extras after your wedding to recoup costs.
Seasonal sales strategies
Timing your purchases strategically can slash costs by 50-75%. Post-holiday clearances offer exceptional deals on items easily repurposed for weddings. Christmas clearances yield candles, metallic decorations, and lights. Post-Valentine’s sales provide romantic elements like rose petals and heart-shaped items you might incorporate subtly.
End-of-season sales at craft stores typically mark down seasonal flowers and greenery by substantial percentages. White and cream flowers work year-round for weddings regardless of their intended season. Back-to-school sales often include organizational items perfect for creating structured displays.
Here’s your shopping calendar for maximum savings:
January: Christmas clearance for lights, candles, metallic decor
February: Valentine’s clearance for romantic elements
August: Back-to-school for organizational items and basic supplies
November: Fall clearance for rustic elements, faux greenery
Sign up for craft store mailing lists to receive coupons often offering 40-50% off single items. Stack these with sales for maximum savings on pricier elements like silk flowers or specialty ribbons.
How to Style Your Cake Table Like a Professional Designer
The difference between amateur and professional styling often comes down to understanding fundamental design principles rather than budget. These techniques transform even modest materials into magazine-worthy displays.
Creating focal points
Every professional display needs a clear focal point that draws the eye and anchors the entire design. Your cake itself serves as the primary focal point, but supporting elements should enhance rather than compete with it.
Position your tallest decorative elements behind and to the sides of your cake, creating a frame that directs attention inward. If using a backdrop, keep it simple enough that it doesn’t distract from your cake. Solid colors, subtle textures, or soft patterns work better than busy designs.
Consider the rule of odd numbers when grouping decorative elements. Three tall candles create more visual interest than two or four. Five small floral arrangements look more intentional than six. This principle applies to everything from the number of cake stands to decorative accents.
Balancing proportions
Professional designers understand that proportion matters more than size. A small cake on a huge table looks lost, while overwhelming decor makes even large cakes appear diminished. The key lies in creating harmonious relationships between all elements.
Your cake should occupy approximately one-third of the table’s visual space, with decorative elements filling another third, and negative space comprising the final third. This breathing room prevents cluttered appearance while allowing each element to shine. Measure your table and cake in advance, then plan decorations accordingly.
When selecting decorative elements, consider their scale relative to your cake tiers. Flowers should be proportional to tier size, candles shouldn’t tower over the top tier, and fabric draping should feel generous without overwhelming. Test arrangements before your wedding day to ensure proper proportions.
Adding finishing touches
Small details distinguish professional styling from amateur attempts. These finishing touches cost little but make substantial visual difference:
Fresh flower petals scattered on the table add romance and tie into bouquets. Even a few roses from the grocery store provide enough petals for lovely scatter. Choose petals that won’t stain linens if crushed.
Ribbon treatment on everything from candles to napkins creates cohesion. Buy ribbon in bulk online for best prices, then use it liberally. Tie consistent bows on all similar elements for professional uniformity.
Personal touches make displays memorable without adding cost. Childhood photos in thrifted frames, handwritten quotes on vintage paper, or meaningful objects tell your story. These elements spark guest conversation while adding unique character.
Clean, pressed linens make everything look more expensive. Iron or steam all fabric elements, ensuring crisp edges and smooth surfaces. This single step elevates even the most basic materials into professional-looking displays.
Photography-ready setup tips
Since your cake table will feature prominently in photos, style it with the camera in mind. Consider lighting throughout the day if you’re having an outdoor reception. Position elements to avoid harsh shadows during typical photography times.
Create depth in your styling by placing elements at varying distances from the front table edge. This layering photographs better than flat, single-plane arrangements. Include elements of different heights to create visual interest from every angle.
Remove clutter before photos. Hidden tape, extension cords, and personal items should be cleared. Assign someone to refresh your display between cake cutting and evening photos, replacing wilted flowers and straightening shifted elements.
Test your complete setup in advance, taking photos from multiple angles. This dress rehearsal reveals issues you might not notice in person. Adjust spacing, replace elements that photograph poorly, and perfect your arrangement before the actual day.
Your Dream Cake Table Within Reach
Creating a stunning wedding cake table doesn’t require sacrificing your honeymoon fund or going into debt. The techniques and strategies shared here prove that thoughtful design, creative sourcing, and strategic styling matter far more than expensive materials. By focusing on professional principles like layering, lighting, and proportion, any couple can achieve the elevated look they desire.
The real magic happens when you combine smart shopping with DIY elements and professional styling techniques. Your guests won’t know whether those gorgeous paper flowers cost $5 or $50, whether the vintage mirrors came from an antique shop or a thrift store, or whether the romantic candlelight comes from expensive pillars or bulk-bought votives. What they will remember is the overall effect – a beautiful, cohesive display that photographs wonderfully and creates the perfect frame for your wedding cake.
Frequently Asked Questions
Q: How far in advance should I start collecting decor items for my cake table?
A: Begin gathering items at least 3-4 months before your wedding. This timeline allows you to shop sales, visit multiple thrift stores, and complete DIY projects without rushing. Starting early also lets you change direction if something isn’t working.
Q: What’s the most important element to splurge on if I have a tiny budget?
A: Quality linens or fabric make the biggest impact for the money. A beautiful tablecloth or runner elevates everything else on the table. If renting seems expensive, consider purchasing fabric and hemming it yourself or finding vintage linens at estate sales.
Q: How do I keep my DIY paper flowers from looking obviously handmade?
A: Focus on consistent sizing within each flower type and use quality tissue or crepe paper rather than regular craft paper. Make them larger than expected – oversized blooms look intentional and dramatic rather than crafty. Also, vary the shades slightly within the same color family for natural-looking depth.
Q: Should I match my cake table decor exactly to my reception colors?
A: Not necessarily. Your cake table can coordinate without matching perfectly. Consider using neutrals with small pops of your wedding colors, or choose one color from your palette to feature prominently. This approach often looks more sophisticated than exact matching.
Q: How many candles are too many for a cake table?
A: There’s no strict number, but follow the rule of varying heights and grouping in odd numbers. Ensure candles don’t overwhelm your cake or create safety hazards. Generally, 5-15 candles of varying sizes create ambiance without overdoing it.
Q: What’s the biggest mistake people make when decorating cake tables on a budget?
A: Trying to fill every inch of space with decorations. Professional displays include negative space that lets elements breathe. Another common error is using too many different colors or styles instead of sticking to a cohesive theme.
Q: Can I reuse ceremony decorations for my cake table?
A: Absolutely! Plan dual-purpose decorations from the beginning. Ceremony aisle markers can flank your cake table, altar arrangements can become cake table backdrops, and shepherd’s hooks can hold lanterns behind your display. This strategy maximizes your decoration investment.
Q: How do I make dollar store silk flowers look more realistic?
A: Separate them from their original bunches and recombine different types for natural-looking variety. Trim stems at varying lengths, bend them slightly for organic shapes, and mix in real greenery when possible. Spray them lightly with water to add realistic dewdrops for photos.