Juggling work schedules, school activities, and family responsibilities leaves little time for cooking nutritious meals from scratch every single day. Many families find themselves reaching for takeout menus or processed convenience foods more often than they’d like, knowing these choices aren’t the healthiest but feeling trapped by time constraints. The guilt of serving less-than-ideal meals adds another layer of stress to already overwhelming daily routines.
Meal prepping offers a practical solution that bridges the gap between wanting to feed your family wholesome food and actually having the time to make it happen. By dedicating just a couple of hours on the weekend, you can set up your entire week with ready-to-eat or quick-to-finish meals that rival any restaurant in both nutrition and taste. This approach transforms chaotic weeknight dinners into calm, organized affairs where everyone gets fed properly without the usual scramble.
The beauty of meal prep lies in its flexibility and efficiency – you’re essentially cooking once but eating multiple times throughout the week. Rather than spending 30-45 minutes each night preparing dinner from scratch, you’ll simply reheat, assemble, or finish partially prepared components in under 15 minutes. Let’s walk through five tried-and-tested meal prep strategies that real families use to maintain healthy eating habits without sacrificing their entire Sunday to kitchen duty.
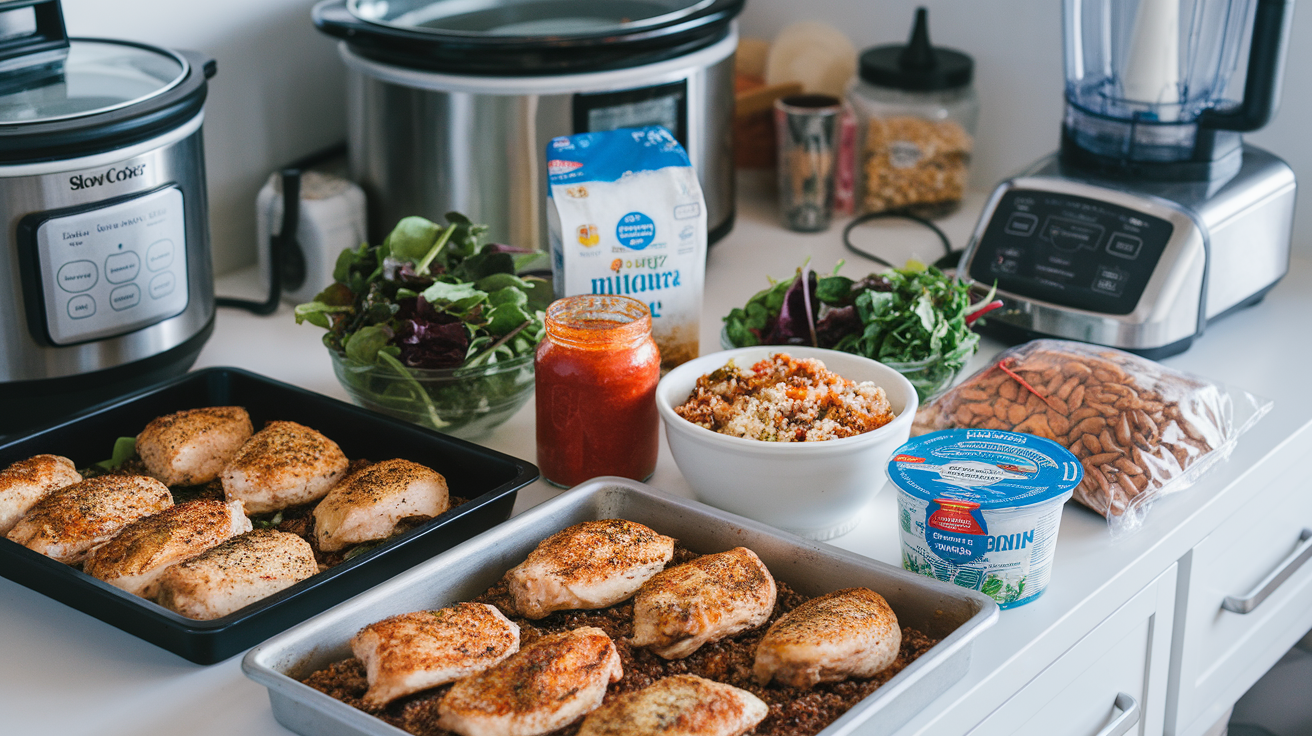
Sheet Pan Dinners: Your One-Tray Solution
Sheet pan dinners have revolutionized weeknight cooking for families everywhere, turning what used to be complicated multi-pot affairs into simple, streamlined meals. The concept couldn’t be more straightforward – arrange your proteins and vegetables on a single baking sheet, season everything well, and let the oven do all the work while you help with homework or catch up on other tasks.
What makes sheet pan meals perfect for families
The magic of sheet pan cooking goes beyond just convenience. When proteins and vegetables roast together, their flavors meld and intensify in ways that separate cooking methods can’t achieve. Chicken releases its juices to flavor surrounding vegetables, while roasted vegetables develop caramelized edges that even vegetable-skeptical kids find appealing. Plus, cooking everything at once means all components finish simultaneously – no more timing different elements to come together at the right moment.
Cleanup becomes almost effortless too. Line your pan with parchment paper or aluminum foil, and you’re looking at maybe two minutes of washing up afterward. Compare that to the usual pile of pots, pans, and utensils from traditional cooking methods, and you’ll understand why busy parents have adopted this technique so enthusiastically.
How to balance proteins and vegetables
Creating nutritionally balanced sheet pan meals requires understanding cooking times and temperatures for different ingredients. Harder vegetables like potatoes, carrots, and winter squash need more time than delicate options like asparagus or cherry tomatoes. Similarly, chicken thighs take longer than fish fillets, while sausages cook faster than pork chops.
Start by choosing ingredients with similar cooking times, or learn to stagger additions to your pan. For instance, you might start roasting chicken and potatoes for 15 minutes, then add broccoli and bell peppers for the remaining cooking time. This approach ensures everything reaches perfect doneness together.
Best combinations for different taste preferences
Finding combinations your whole family enjoys might take some experimentation, but certain pairings consistently win approval across different palates. Mediterranean-inspired combinations featuring chicken, olives, tomatoes, and feta cheese appeal to adventurous eaters. Meanwhile, classic American flavors like barbecue-seasoned chicken with corn and sweet potatoes satisfy traditional preferences.
Don’t overlook the power of familiar seasonings to make new vegetables more appealing. Taco-seasoned everything – from cauliflower to Brussels sprouts – suddenly becomes acceptable to kids who normally refuse vegetables. Italian herbs transform ordinary chicken and vegetables into something that tastes like pizza toppings, another kid-friendly angle.
For families with varying spice tolerances, prep your vegetables and proteins plain, then let everyone add their preferred seasonings before cooking. One corner of the pan might have mild seasonings for younger children, while another section gets a spicy kick for the adults. This customization takes no extra time but keeps everyone happy.
Storage and reheating techniques
Proper storage extends the life of your sheet pan creations significantly. Allow everything to cool completely before transferring to airtight containers – hot food creates condensation that leads to sogginess. Glass containers work particularly well because they can go straight from refrigerator to microwave or oven for reheating.
Consider how you’ll use the meals when deciding on storage strategies. If different family members eat at different times, portion everything into individual containers immediately. For family dinners, larger containers work fine. Either way, most sheet pan meals stay fresh for four to five days when properly refrigerated.
When reheating, avoid the microwave if possible. A quick stint in a toaster oven or regular oven at 350°F for 10-15 minutes restores the crispy edges and fresh-roasted taste that makes these meals so appealing initially. If you must use a microwave, slightly undercook vegetables during initial preparation so they don’t turn mushy during reheating.
Time-saving prep strategies
Maximize your efficiency by prepping multiple sheet pan meals during one session. While one pan cooks in the oven, prepare the next one. With two oven racks, you can cook two different meals simultaneously, though you might need to rotate pans halfway through for even cooking.
Pre-cutting vegetables on grocery shopping day saves precious time during actual meal prep. Store chopped vegetables in containers with slightly damp paper towels to maintain freshness. Similarly, marinate proteins the night before your prep session – they’ll have better flavor and you’ll save active cooking time.
Mason Jar Salads That Stay Fresh All Week

Mason jar salads have transformed the way families approach healthy lunches and quick dinners. These portable, perfectly portioned meals stay crisp and fresh for up to five days when assembled correctly, making them ideal for grab-and-go situations. The key lies in understanding the science of layering – keeping wet ingredients away from delicate greens prevents the soggy, wilted salads that turn people off from pre-made options.
Layering technique for maximum freshness
The golden rule of jar salads revolves around strategic layering that maintains each ingredient’s integrity throughout the week. Your bottom layer should always be the dressing – this keeps it separated from lettuce and other ingredients that would otherwise become soggy. Choose wide-mouth mason jars for easier assembly and eating, typically quart-sized for adult portions and pint-sized for children.
Above the dressing, add hardy vegetables that actually benefit from marinating. Cherry tomatoes, cucumbers, bell peppers, and carrots create a barrier between dressing and more delicate ingredients. These vegetables absorb just enough dressing to become flavorful without losing their crunch.
The middle layers should contain grains, proteins, and cheese. Quinoa, brown rice, or pasta adds substance, while chickpeas, grilled chicken, or hard-boiled eggs provide protein. These ingredients stay protected from both the dressing below and the greens above.
Next come ingredients that need protection from moisture: nuts, seeds, dried fruits, or croutons. Keeping these elements in the middle prevents them from becoming soggy from dressing or wilted from contact with wet lettuce.
Kid-friendly salad combinations
Getting children excited about salad becomes easier when you involve them in choosing ingredients and creating their own combinations. Start with familiar favorites and gradually introduce new elements. A “pizza salad” with mozzarella, pepperoni pieces, cherry tomatoes, and Italian dressing often wins over skeptical young eaters.
Consider creating “rainbow jars” where children pick one ingredient of each color. Red strawberries, orange carrots, yellow corn, green lettuce, blueberries, and purple cabbage make eating vegetables feel like a game. This approach naturally creates nutritional variety while making the meal visually appealing.
Taco salads work wonderfully in jars too. Layer salsa as your dressing, then add black beans, corn, cheese, and lettuce. Pack tortilla chips separately for crunch. Kids love the familiar flavors and the fun of shaking everything together before eating.
Protein additions that work well
Proteins transform a simple salad from a side dish into a satisfying meal. Grilled chicken, when properly seasoned and cooked, stays moist for days in the refrigerator. Cut it into bite-sized pieces for easier eating directly from the jar. Rotisserie chicken offers a convenient shortcut for busy prep days.
Plant-based proteins deserve consideration too. Here are excellent options that hold up well in jar storage:
Chickpeas: Roasted with spices or plain from the can, these add substance and fiber
Lentils: Pre-cooked lentils provide protein while absorbing surrounding flavors beautifully
Tofu: Baked tofu cubes maintain their texture better than soft varieties
Hard-boiled eggs: Peel and add whole or sliced on prep day for convenience
Cheese: Feta, cheddar cubes, or fresh mozzarella balls add protein and richness
Dressing strategies that prevent sogginess
The dressing makes or breaks a jar salad, both in flavor and texture preservation. Thicker dressings like ranch, Caesar, or tahini-based options create better barriers than thin vinaigrettes. However, any dressing works when properly contained at the jar’s bottom.
Make your own dressings to control ingredients and sodium levels. A basic formula of three parts oil to one part acid (vinegar or citrus juice) plus seasonings creates endless variations. Prepare a large batch during meal prep to use throughout the week.
Some families prefer keeping dressing separate entirely, especially for children who might want different amounts. Small condiment containers or repurposed baby food jars work perfectly for portion-controlled dressing storage. This method also allows different family members to choose different dressings for the same base salad.
Breakfast Burritos You Can Freeze and Reheat
Breakfast often becomes the most chaotic meal of the day, with everyone rushing to get ready for work and school. Having a freezer stocked with homemade breakfast burritos changes morning dynamics completely. These handheld meals provide complete nutrition – proteins, whole grains, and vegetables – in a format that can be eaten at the table or on the go.
Essential ingredients for nutritious mornings
Building a better breakfast burrito starts with quality ingredients that freeze and reheat well. Scrambled eggs form the protein foundation, but slightly undercook them during prep since they’ll continue cooking during reheating. This prevents the rubbery texture that plagues many frozen egg dishes.
Whole wheat or sprouted grain tortillas add fiber and nutrients compared to white flour versions. Size matters here – large 10-inch tortillas hold fillings better without tearing, while smaller 8-inch versions work well for children’s portions. Warm tortillas briefly before assembling to make them more pliable and less likely to crack during rolling.
Vegetables add crucial nutrients and flavor variety. Sautéed bell peppers and onions are classic additions, but don’t stop there. Spinach wilts down to almost nothing while packing serious nutritional punch. Sweet potatoes, black beans, and even leftover roasted vegetables from dinner work wonderfully.
Wrapping techniques that prevent freezer burn
Proper wrapping technique determines whether your burritos emerge from the freezer as delicious as the day you made them or as dried-out disappointments. Start by not overfilling – leave at least two inches of space around all edges for proper folding. Too much filling leads to burst burritos and freezer burn at exposed edges.
After filling, fold in the sides first, then roll tightly from bottom to top. The tighter your roll, the better the burrito holds together during storage and reheating. Let assembled burritos cool completely before wrapping – residual heat creates ice crystals that affect texture.
Double-wrapping provides optimal protection against freezer burn. First, wrap each burrito individually in aluminum foil, squeezing out excess air. Then place foil-wrapped burritos in large freezer bags, removing as much air as possible. Label bags with contents and date – most breakfast burritos maintain quality for up to three months when properly stored.
Some families prefer using parchment paper for the first layer instead of foil, especially if they’ll primarily reheat in the microwave. Parchment prevents sticking and can go directly into the microwave, unlike foil. Either method works well with proper execution.
Customization options for picky eaters
Creating an assembly line setup lets each family member customize their burritos according to preference. Set out all prepared ingredients in separate bowls and let everyone build their own. This approach takes slightly longer initially but ensures everyone actually eats what you’ve prepared.
Mark different burrito varieties with colored permanent markers on the foil before freezing. Red might indicate spicy versions with jalapeños and hot sauce, while blue marks kid-friendly options with just eggs and cheese. This system prevents morning surprises and arguments about who gets which burrito.
Consider making “breakfast burrito bowls” for family members who prefer eating with a fork or following low-carb diets. Prepare all the same fillings but store them in containers without tortillas. These reheat beautifully and can be served over lettuce, cauliflower rice, or simply eaten as-is.
Quick reheating methods for school mornings
The microwave offers the fastest reheating option for busy mornings. Remove foil wrapping (if used) and wrap the frozen burrito in a damp paper towel. Microwave on 50% power for 2-3 minutes, flip, then continue for another 1-2 minutes on full power. The damp paper towel prevents the tortilla from drying out while ensuring even heating.
Oven reheating takes longer but produces superior results with crispy exteriors. Leave burritos in their foil wrapping and bake at 350°F for 35-40 minutes straight from frozen. For partially thawed burritos, reduce time to 20-25 minutes. This method works well when you have multiple burritos to reheat simultaneously.
Toaster ovens split the difference between speed and quality. Unwrap the burrito and place it on the toaster oven tray. Heat at 350°F for 15-20 minutes, turning once halfway through. The exterior gets slightly crispy while the inside heats evenly.
Air fryers have become another popular reheating option. Place unwrapped burritos in the basket at 350°F for 12-15 minutes, flipping once. This method produces the crispiest exterior in the shortest oven-style cooking time.
Slow Cooker Meals That Cook While You Work
The slow cooker stands as perhaps the ultimate tool for busy families wanting home-cooked meals without active cooking time. Set everything up before leaving for work, and return home to a house filled with delicious aromas and dinner ready to serve. This method particularly suits tough cuts of meat that become tender through long, slow cooking, often at lower prices than quick-cooking cuts.
Best proteins for all-day cooking
Certain proteins thrive in the slow cooker environment while others turn into unappetizing mush. Chicken thighs outperform breasts significantly – their higher fat content keeps them moist during extended cooking. Bone-in thighs add even more flavor to the surrounding liquid, creating richer sauces and gravies.
Beef chuck, pork shoulder, and lamb shanks transform from tough, inexpensive cuts into melt-in-your-mouth delicacies after six to eight hours of slow cooking. These cuts contain connective tissue that breaks down into gelatin, creating silky, rich textures impossible to achieve through quick cooking methods.
Ground meats work wonderfully for chilis, pasta sauces, and taco fillings. Brown them first if possible – this extra step adds tremendous flavor depth, though you can skip it when truly pressed for time. Turkey, beef, and even plant-based ground alternatives all perform well in slow cooker recipes.
Vegetable timing considerations
Not all vegetables appreciate eight hours of slow cooking. Root vegetables like potatoes, carrots, and parsnips hold up beautifully throughout long cooking times. Place them on the bottom of the slow cooker where they’ll cook in the liquid and maintain their shape better.
Delicate vegetables need different treatment entirely. Frozen peas, fresh spinach, and zucchini should be added during the last 30 minutes of cooking. This preserves their color, texture, and nutritional value. Keep these vegetables prepped in containers so someone arriving home first can quickly stir them in.
Onions and garlic form the flavor foundation for most slow cooker meals. While they’ll cook fine when added raw, sautéing them first intensifies their flavors significantly. Spend five minutes browning onions during morning prep for noticeably better-tasting dinners.
Hard vegetables like butternut squash occupy a middle ground. Add them halfway through cooking if someone will be home, or cut them smaller if they need to cook all day. Experimentation teaches you how your particular slow cooker handles different vegetables.
Portion control and storage solutions
Slow cookers often produce large quantities, perfect for feeding crowds or creating intentional leftovers. Immediately portion extra servings into meal-sized containers once cooking completes. This prevents overeating and creates ready-made lunches or dinners for later in the week.
Freeze portions in muffin tins for individual servings of soups, stews, or chilis. Once frozen solid, pop them out and store in freezer bags. These single servings thaw quickly for solo dinners or lunch portions. Silicone muffin cups make removal even easier.
Label everything clearly with contents and date. Frozen slow cooker meals generally maintain quality for three months, though they’re usually consumed much sooner in busy households. Create a freezer inventory list to track what’s available – this prevents forgotten meals from developing freezer burn.
Converting family favorites to slow cooker versions
Nearly any braised or stewed recipe adapts to slow cooker cooking with minor adjustments. Reduce liquid amounts by about one-third since slow cookers don’t allow evaporation like stovetop cooking. You can always add more liquid near the end if needed.
Traditional soup recipes transfer almost directly. The main change involves when you add different ingredients. Start with aromatics, proteins, and hardy vegetables. Save pasta, rice, and delicate vegetables for the final hour to prevent mushiness.
Your grandmother’s pot roast, mom’s chili, or that restaurant stew you love can all be recreated in the slow cooker. Start by browning meats and sautéing aromatics if the original recipe calls for it – these steps remain important for flavor development. Then transfer everything to the slow cooker with adjusted liquid amounts.
Slow cookers excel at “dump and go” recipes where everything goes in at once. While these might not match the complexity of traditionally cooked versions, they deliver satisfying meals with minimal effort. Keep a collection of these ultra-simple recipes for your busiest weeks.
Snack Boxes That Replace Processed Options
Pre-packaged snacks dominate grocery store shelves, tempting families with convenience despite their processed ingredients and excessive packaging. Creating your own snack boxes provides healthier alternatives while saving money and reducing waste. These portable portions satisfy hunger between meals without the sugar crashes and empty calories of commercial options.
Balanced combinations of nutrients
Building better snack boxes starts with understanding nutritional balance. Each box should ideally contain protein for satiety, complex carbohydrates for sustained energy, and healthy fats for satisfaction. This combination prevents the blood sugar spikes and crashes that leave kids cranky and adults reaching for more snacks an hour later.
A simple formula guides assembly: pick one from each category to create countless combinations. Proteins might include cheese cubes, hummus, nut butters, or hard-boiled eggs. Complex carbohydrates could be whole grain crackers, apple slices, or baby carrots. Healthy fats come from nuts, seeds, or avocado.
Creating themed boxes adds excitement while maintaining nutrition. “Pizza boxes” contain mozzarella sticks, cherry tomatoes, and whole wheat crackers. “Trail mix boxes” combine nuts, dried fruit, and dark chocolate chips. These familiar flavors make healthy snacking more appealing than telling kids to eat their vegetables.
Portion sizes for different ages
Understanding appropriate portions prevents both waste and overconsumption. Toddlers typically need about 100-150 calories per snack, while teenagers might require 200-300 calories to sustain them between meals. Adults’ needs vary based on activity level and meal spacing.
Visual guides help with portioning:
Cheese: A portion equals two dice-sized cubes for young children, four for teens and adults
Nuts: One tablespoon for children, two tablespoons for adults
Crackers: 5-6 for young children, 10-12 for older kids and adults
Fruit: Half cup for children, one cup for adults
Vegetables: As much as they’ll eat – it’s hard to overdo vegetables
Pre-portioning during prep prevents mindless overeating. Use small containers or bags for individual servings rather than eating directly from large packages. This strategy helps everyone develop better portion awareness while making grab-and-go snacking easier.
Storage containers that maintain freshness
Investment in quality storage containers pays dividends in food freshness and reduced waste. Glass containers, while heavier, don’t absorb odors or stains and keep food fresh longest. They’re perfect for at-home snacking or situations where weight doesn’t matter.
Bento-style boxes with multiple compartments prevent flavors from mingling while keeping different textures separate. Crackers stay crispy away from cut fruit, while vegetables maintain their crunch separated from hummus. These boxes make snacks visually appealing – important for encouraging healthy eating.
For true portability, lightweight plastic containers work well despite being less eco-friendly than glass. Look for BPA-free options with tight-fitting lids. Silicone bags offer a reusable alternative to disposable plastic bags, though they require more careful cleaning.
Small containers within larger boxes add versatility. Two-ounce containers perfect for dips, nut butters, or dressings fit inside larger boxes. This system lets you pack wet and dry ingredients separately while keeping everything together.
Rotating variety to prevent boredom
Snack fatigue leads families back to processed options when healthy choices become monotonous. Combat this by rotating through different combinations weekly. Keep a list of successful combinations and cycle through them monthly rather than making the same things every week.
Seasonal ingredients naturally create variety. Summer brings berries and stone fruits, fall offers apples and pears, winter highlights citrus, and spring features early vegetables. Building snacks around seasonal produce ensures better flavor and value while preventing year-round repetition.
Let family members contribute ideas for new combinations. Kids especially enjoy suggesting creative pairings, even if not all experiments succeed. This involvement increases their willingness to eat what they’ve helped plan.
Consider “snack box buffets” occasionally where everyone assembles their own boxes from prepared ingredients. This approach takes slightly longer but ensures everyone gets exactly what they want while trying new combinations. Photo document favorite creations for future reference.
Making Meal Prep a Sustainable Family Habit
Successful meal prepping isn’t about perfection or spending entire weekends in the kitchen. Finding your family’s rhythm takes time and experimentation, but the payoff in reduced stress and improved nutrition makes the effort worthwhile. Start small with just one or two techniques that appeal most to your family’s needs and gradually expand your repertoire as these become routine.
The key to long-term success lies in flexibility and forgiveness. Some weeks you’ll prep everything beautifully, while others might see you grabbing rotisserie chicken and pre-cut vegetables to speed things along. Both approaches feed your family nutritious meals, which remains the ultimate goal. Remember that any amount of preparation beats starting from zero every night, so celebrate small victories rather than aiming for meal prep perfection that doesn’t exist in real family life.
Frequently Asked Questions
Q: How long do meal prepped foods actually stay fresh in the refrigerator?
A: Most properly stored meal prep items remain fresh for 4-5 days in the refrigerator. Cooked grains and roasted vegetables typically last 5 days, while dressed salads stay crisp for 3-4 days when properly layered. Raw cut vegetables can last up to a week when stored with slightly damp paper towels.
Q: What’s the best day of the week to do meal prep for busy families?
A: Sunday remains popular, but the best day is whichever works consistently for your schedule. Some families split prep between Saturday and Wednesday for maximum freshness. Others prep on Thursday evenings for the weekend and following week.
Q: Can I meal prep if my family members have different dietary restrictions?
A: Absolutely. Prep components separately and let everyone assemble according to their needs. Cook proteins plain, prepare multiple grain options, and keep sauces and seasonings separate. This modular approach accommodates various dietary needs without cooking entirely separate meals.
Q: How much money does meal prepping actually save?
A: Families typically save 20-50% on food costs through meal prepping. Savings come from reduced food waste, fewer impulse purchases, and less reliance on takeout. A family of four might save $200-400 monthly by replacing restaurant meals with prepped options.
Q: What equipment do I really need to start meal prepping effectively?
A: Start with basic storage containers, cutting boards, and sharp knives. Sheet pans, a slow cooker, and mason jars expand your options significantly. Avoid buying everything at once – build your collection as you discover which meal prep methods work best for your family.
Q: How do I prevent meal prep burnout?
A: Rotate between different prep methods weekly and keep sessions under 2 hours. Prep with a partner or while listening to podcasts for entertainment. Take occasional weeks off without guilt, using simpler solutions like slow cooker dumps or sheet pan meals requiring minimal prep.
Q: What should I do when my kids refuse to eat the meal prepped food?
A: Involve children in choosing and preparing meals to increase buy-in. Start with familiar foods in new formats rather than completely foreign dishes. Keep one “safe” food in each meal they’ll definitely eat while gradually introducing new items.
Q: Can I freeze mason jar salads or assembled grain bowls?
A: Salads don’t freeze well due to lettuce and fresh vegetables becoming mushy when thawed. However, grain bowls without fresh vegetables freeze beautifully. Prepare freezer-friendly grain bowls with cooked grains, proteins, and roasted vegetables, adding fresh elements after reheating.